
Manual greasing looks simple, but the difference between “some grease went in” and “this bearing is protected” is often the difference between reliable operation and avoidable downtime. Good greasing techniques combine the right lubricant, clean fittings, controlled pressure, measured quantity, and follow-up inspection. When maintenance teams treat manual lubrication as a precise task rather than a routine chore, they reduce waste, improve equipment life, and lower the risk of failures in bearings, motors, conveyor pulleys, and other critical assets.
What does proper manual greasing actually involve?
Proper manual greasing means applying the correct grease, in the correct amount, through a clean fitting, at a controlled pace, while watching for signs that the component is accepting lubrication safely. It is not simply pumping until resistance rises or grease appears somewhere around the seal. The best approach is planned, measured, and repeatable, with each lubrication point handled according to its operating conditions.
At a practical level, this starts with knowing the asset. A small electric motor bearing, a heavily loaded conveyor pulley, and an outdoor bearing exposed to washdown or dust may all need different intervals, quantities, and grease types. The goal is to maintain an effective lubricating film without forcing grease past seals, trapping heat, or introducing contamination.
This is why lubrication best practices emphasize both technique and discipline. The person holding the grease gun needs clear instructions, a clean work process, and a way to verify that the job was done consistently. Without those basics, manual greasing can become one of the most variable tasks in the maintenance program.
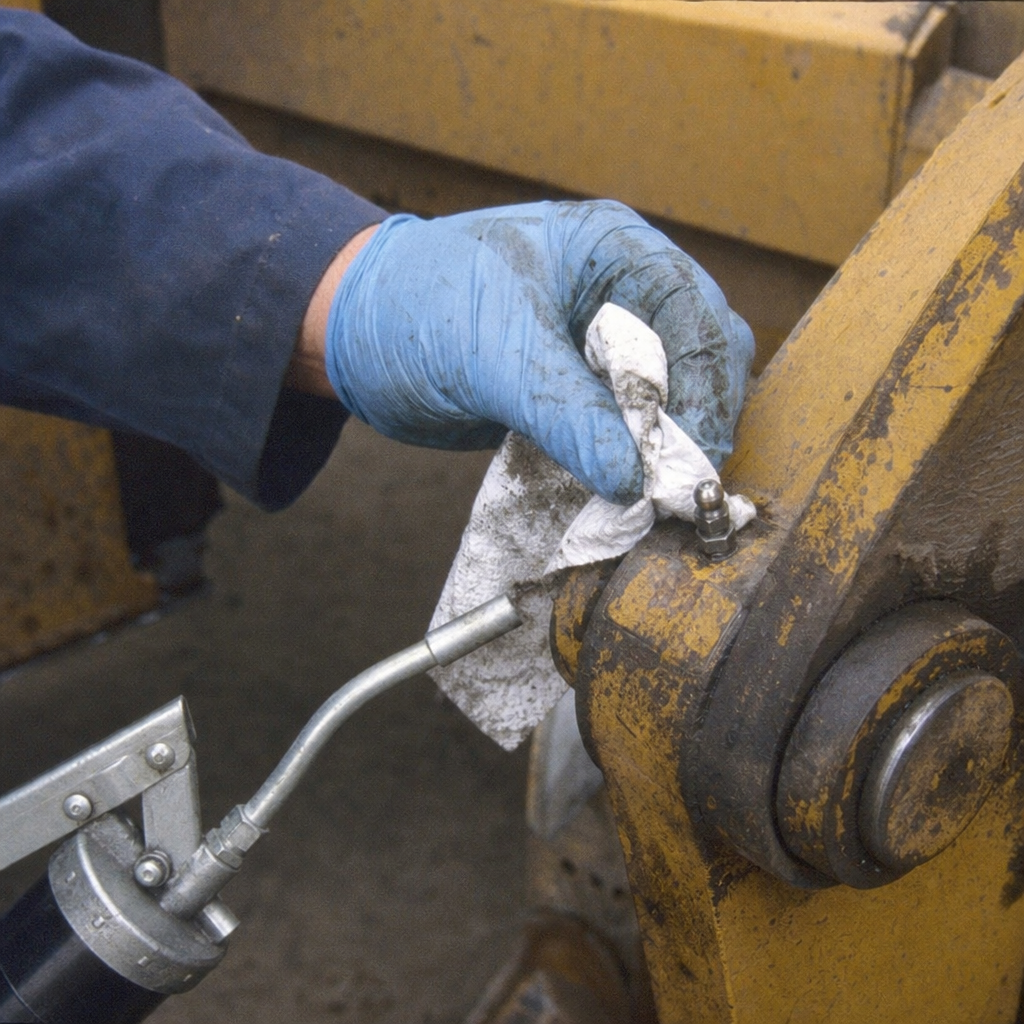
Cleanliness is the first rule of manual lubrication
Grease protects moving surfaces, but it can also carry dirt directly into the bearing if the fitting is not cleaned first. Before connecting the grease gun, wipe the Zerk fitting and the surrounding area with a clean, lint-free cloth. If the fitting is packed with hardened grease, dust, paint, or debris, clean it carefully before applying pressure.
The coupler on the grease gun should also be kept clean. A contaminated coupler can transfer grit from one lubrication point to the next, turning a preventive maintenance task into a contamination problem. Store grease guns with caps or covers where possible, and avoid laying the coupler on dusty floors, machine frames, or dirty benches.
Good housekeeping matters after greasing, too. Wipe away excess grease that collects around the fitting unless the equipment procedure says otherwise. Excess grease can attract dust, hide leaks, and make future inspections harder. A clean lubrication point makes it easier to spot abnormal discharge, damaged seals, blocked fittings, or changes in grease condition.
Selecting the right grease and grease gun
The right manual grease application methods depend on both the lubricant and the tool. Always match the grease to the equipment requirement, considering base oil viscosity, thickener type, operating temperature, speed, load, water exposure, and compatibility with the grease already in service. Mixing incompatible greases can reduce performance, so confirm before switching products.
Manual grease guns come in several common styles:
- Lever grease guns: Good for general shop and industrial work. They can generate high pressure and deliver a relatively large amount per stroke, but two-handed operation may be awkward in tight areas.
- Pistol-grip grease guns: Useful when one hand is needed to hold the coupler in place. They are convenient for hard-to-reach points, though each stroke may deliver less grease than a lever gun.
- Air-powered grease guns: Helpful for repetitive work, but they can deliver grease quickly. Without control, they may increase the chance of over-greasing.
- Rechargeable electric grease guns: Efficient for large routes and frequent lubrication tasks. They reduce operator fatigue but should be used with care because they can apply grease rapidly and at high pressure.
Pressure capacity matters, but higher is not automatically better. Grease guns can generate enough pressure to damage seals or force grease into areas it should not go. Choose a tool that fits the task, and train technicians to feel resistance, listen for abnormal sounds, and stop when the expected amount has been delivered.
Calibrating the grease gun makes dosing repeatable
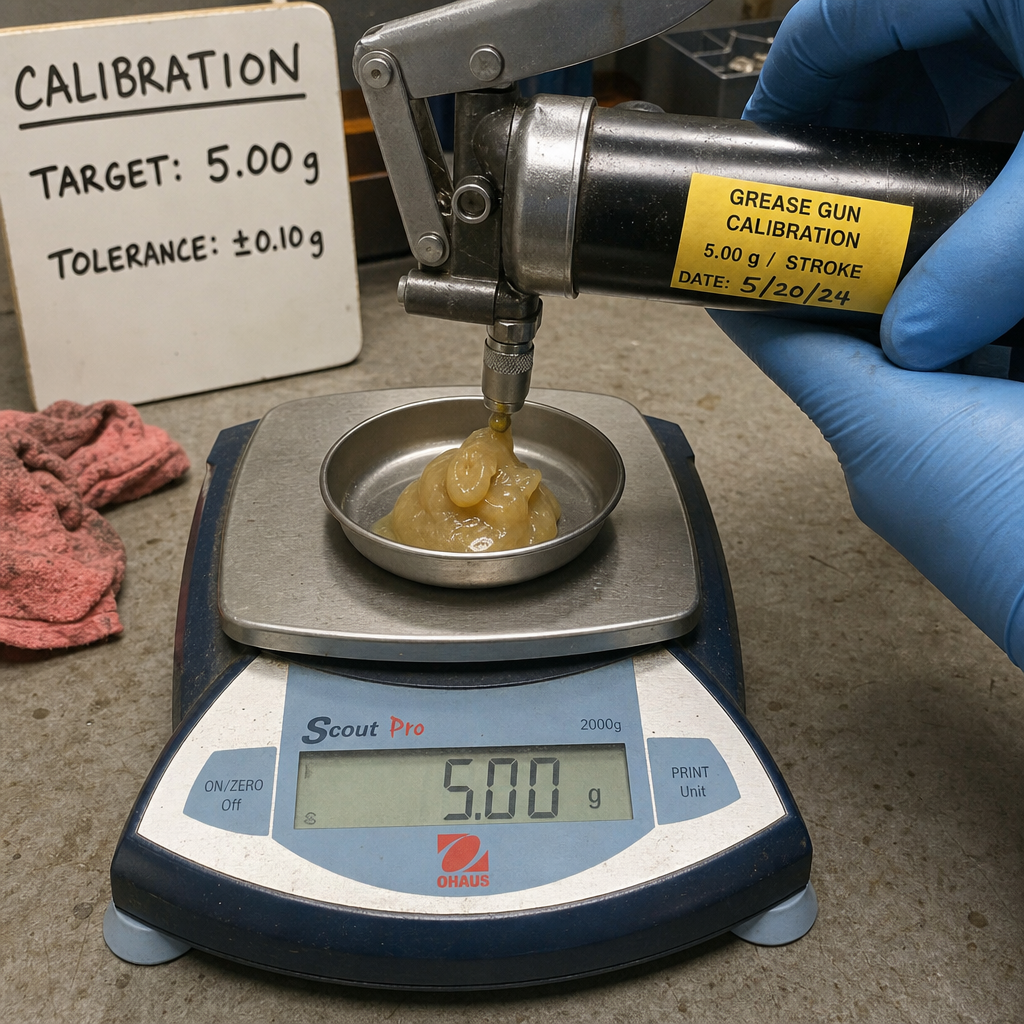
One of the most useful improvements to manual greasing is learning how much grease each pump stroke delivers. Grease output varies by gun type, grease consistency, temperature, cartridge condition, and technique. If a maintenance instruction says to add a certain amount but the technician only counts strokes, the actual quantity may be inconsistent unless the gun has been calibrated.
A simple calibration process can help:
- Use the grease and grease gun that will be used in the field.
- Purge air from the gun so the output is consistent.
- Pump a set number of strokes, such as 10, into a clean container or onto a clean weighing surface.
- Weigh the grease output.
- Divide the total weight by the number of strokes to estimate grease per stroke.
- Label the gun or record the value in the lubrication route.
- Recheck periodically, especially after changing grease type, gun model, or operating conditions.
For higher precision, a grease meter or digital flow monitor can be added to some manual setups. These tools help technicians apply a known quantity instead of relying only on stroke counts. They can be especially useful where over-greasing is a known issue, where bearings are expensive, or where downtime risk is high.
How much grease is enough?
Enough grease is the amount required to restore the lubricating film without overfilling the bearing cavity or damaging the seal. There is no universal number of pumps that applies to every bearing. Bearing size, speed, housing design, operating temperature, environmental contamination, and relubrication interval all affect the correct quantity.
A practical rule is to follow the equipment manufacturer’s guidance or the site’s lubrication procedure first. If those instructions are missing, maintenance teams should develop a controlled method based on bearing details and operating history rather than relying on guesswork. The key is consistency: the same point should receive the same measured amount unless operating conditions change.
Watch the component during and after greasing. If grease immediately escapes through a relief path, that may be expected on some housings, but heavy seal leakage, rising temperature, unusual noise, or increased vibration can signal a problem. If a bearing repeatedly seems to “need more grease,” the issue may be contamination, misalignment, incorrect lubricant, a blocked passage, or bearing damage rather than a lack of grease.
Avoiding over-greasing and under-greasing
Over-greasing and under-greasing are opposite mistakes, but both can shorten equipment life. Too little grease allows metal surfaces to run without adequate separation, increasing wear, heat, and noise. Too much grease can churn inside the bearing, raise operating temperature, push past seals, and attract contaminants.
These mistakes are especially costly on production assets where a single failure can stop a line. Conveyor systems are a common example. A conveyor pulley bearing failure may lead to belt tracking problems, unplanned downtime, secondary damage, and difficult repairs in areas that are not easy to access.
To reduce risk, build these habits into every lubrication route:
- Confirm the asset and lubrication point before applying grease.
- Use the specified grease, not a nearby cartridge that “looks close enough.”
- Clean the fitting and coupler before connection.
- Apply grease slowly so pressure has time to equalize.
- Stop at the specified quantity, not when the operator feels like stopping.
- Watch for blocked fittings, damaged relief ports, or abnormal leakage.
- Record unusual findings instead of treating them as routine.
A steady, controlled pace matters. Fast pumping can create pressure spikes, especially in cold conditions or long grease lines. If a fitting will not accept grease, do not keep forcing it. Investigate the blockage, replace the fitting if needed, and check whether hardened grease or damaged passages are preventing flow.
Field technique that protects bearings
Manual greasing works best when the technician follows the same sequence every time. That consistency helps prevent missed points, double greasing, contamination, and incorrect lubricant use. It also makes training easier because each step has a clear purpose.
A reliable field process looks like this:
- Review the lubrication route. Confirm the equipment, grease type, quantity, and safety requirements.
- Make the machine safe. Follow site lockout, guarding, access, and operating-state procedures.
- Inspect before greasing. Look for damaged fittings, loose housings, high temperature, noise, vibration, or signs of leakage.
- Clean the point. Wipe the fitting and surrounding area before connecting the coupler.
- Connect securely. Keep the coupler aligned so grease enters the fitting rather than leaking around it.
- Apply measured grease slowly. Use calibrated stroke counts, a meter, or a documented procedure.
- Observe response. Watch for abnormal pressure, seal movement, unusual discharge, or grease escaping where it should not.
- Clean and document. Remove excess grease, note any concerns, and record completion.
This process may sound basic, but it is powerful because it prevents common shortcuts. Manual lubrication often fails when people are rushed, routes are unclear, tools are dirty, or quantities are treated casually. A clear sequence turns an ordinary maintenance task into a repeatable reliability practice.
Monitoring closes the loop after grease is applied
Manual greasing should not end when the grease gun comes off the fitting. The equipment’s response tells you whether the lubrication strategy is working. Temperature checks, vibration readings, ultrasound inspection, visual condition checks, and operator feedback can all help reveal whether a bearing is running smoothly or trending toward failure.
Lubrication monitoring systems can support this process by adding better visibility. Depending on the setup, they may help track lubrication intervals, record completed tasks, measure grease delivery, or monitor condition indicators that point to friction or wear. Even a simple record-keeping system is valuable if it helps the team identify repeated overuse, missed points, or assets that require attention more often than expected.
The most important point is to use the data. If a bearing runs hot after every lubrication event, adding more grease is not automatically the answer. If vibration improves briefly and then worsens, the lubrication interval, grease type, contamination level, or bearing condition may need review. Monitoring turns greasing from a calendar-based habit into a feedback-driven maintenance activity.
Manual and automatic lubrication both have a place
Automatic and centralized systems can improve consistency, reduce exposure to hazardous areas, and deliver small amounts of lubricant at planned intervals. They are often a strong option for difficult-to-access points, high-frequency lubrication needs, or assets where consistent lubrication is critical.
Manual greasing remains important because not every machine needs a dedicated system. Smaller assets, remote equipment, low-frequency points, and inspection-heavy routes may still be better served manually. Manual work also gives technicians a chance to inspect fittings, housings, seals, guards, and surrounding conditions up close.
The best programs do not treat manual and automatic lubrication as competitors. They use the right method for each asset. Where manual greasing is retained, the same standards still apply: clean tools, correct grease, calibrated delivery, safe access, and documented follow-up.
A practical checklist for stronger lubrication routes
Use this checklist to tighten daily execution and improve reliability:
- Are all lubrication points clearly identified and accessible?
- Is the correct grease listed for each point?
- Are grease guns labeled by lubricant type to prevent cross-contamination?
- Has each grease gun been calibrated for output per stroke?
- Are fittings cleaned before every application?
- Are technicians trained to stop when pressure feels abnormal?
- Are completed tasks and unusual conditions recorded?
- Are bearing temperature, noise, leakage, and vibration reviewed after lubrication?
- Are recurring issues investigated rather than handled with extra grease?
Manual greasing is most effective when it is treated as a skilled maintenance activity. The right technique protects bearings, reduces waste, and gives the team early warning when equipment behavior changes.
The takeaway
Strong greasing techniques are built on cleanliness, correct lubricant selection, measured application, and careful observation. When teams apply lubrication best practices consistently, they reduce the risk of over-greasing, under-greasing, contamination, and preventable bearing damage.
Whether the job involves a small motor bearing or a conveyor pulley in a demanding production area, the principle is the same: apply the right grease, in the right amount, with the right tool, and verify the result. That practical discipline is what turns manual greasing into a dependable part of a reliability-focused maintenance program.